How to Extract Data from Invoices in Zapier Without Code
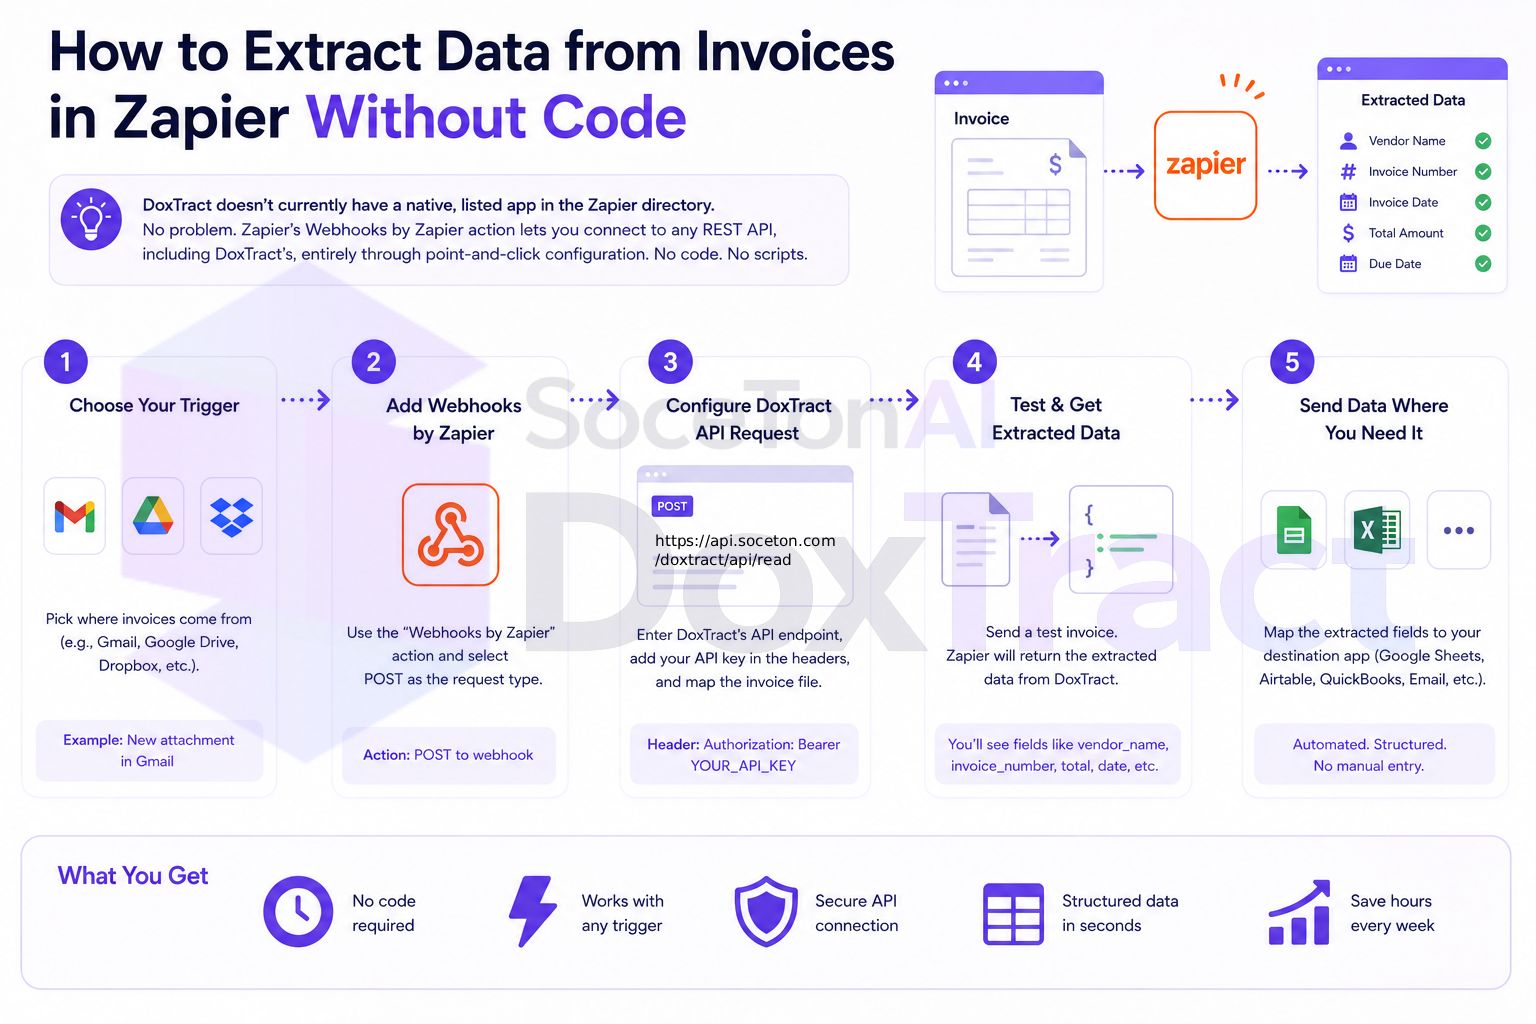
A quick note before diving in: DoxTract doesn't currently have a native, listed app in the Zapier directory. That's not a dead end, though — Zapier's built-in Webhooks by Zapier action lets you connect to any REST API, including DoxTract's, entirely through point-and-click configuration. No code editor, no scripting step. This guide walks through wiring it up that way.
What You'll Need
A DoxTract account with a saved extraction template for your invoice format
Your DoxTract
API KeyandAPI Secret(generate these from your dashboard)A Zapier account on a plan that includes Webhooks by Zapier (it's a premium action, not available on Zapier's free tier)
Wherever you want the extracted data to end up — Google Sheets, QuickBooks, Xero, or similar
Step 1: Build Your Extraction Template First
Before touching Zapier, make sure you have a working template. In the Template Editor — free to try without signing up — upload a sample invoice and draw Fixed Header Box → Value Box pairs for each field you want: vendor, date, total, line items. Save it, and note the template_id shown in the Doxtract dashboard — you'll need it for the Zap.
Step 2: Set Your Zap Trigger
Pick whatever already collects your invoices — common choices:
Gmail — "New Attachment" trigger, filtered to a label or search query
Google Drive / Dropbox — "New File in Folder" trigger, watching wherever invoices land
Email Parser by Zapier — if invoices arrive as email attachments to a dedicated forwarding address
Whichever you choose, confirm the trigger step returns the invoice file itself (not just a filename or link with no file data) — you'll need to pass that file to DoxTract in the next step.
Step 3: Add a Webhooks by Zapier Action
This is the step that stands in for a native integration:
Add a new action step and search for Webhooks by Zapier.
Choose POST as the action event.
Set the URL to:
https://api.soceton.com/doxtract/api/readUnder Headers, add:
   x-api-key: YOUR_API_KEY
   x-api-secret: YOUR_API_SECRET
Set Payload Type to
form(multipart form data).Under File, map the
filesfield to the file data from your trigger step (e.g., the Gmail attachment or Drive file).Under Data, add a field named
datawith the value:
{"template_id":"YOUR_TEMPLATE_ID"}Test the step. For a single file, DoxTract returns extracted data immediately in the response — no polling or delay step needed for this one-file-at-a-time workflow.
Step 4: Map the Extracted Fields
Once the test succeeds, Zapier shows you the response fields from that test call — typically nested under a result object matching whatever fields your template defines (vendor, date, total, line items, and so on). These become available to map into your next step, the same way any other Zapier trigger data would be.
Step 5: Send the Data Where It Needs to Go
Add a final action step using the extracted fields:
Google Sheets — "Create Spreadsheet Row": map each extracted field to a column. This gives you a running log of every invoice processed, useful for both bookkeeping and audit trail purposes.
QuickBooks Online — "Create Bill" or "Create Expense": map vendor, date, and amount directly if you're ready to skip a manual import step entirely.
Xero — "Create Bill": same idea, using Xero's native Zapier action.
Step 6: Turn It On and Test With a Real Invoice
Run one real invoice through the whole Zap before turning it on for everything. Check that the extracted fields land correctly in your destination — this is also a good moment to double-check your DoxTract template is pulling the right fields, since a Zap will faithfully automate a mismatch just as easily as a correct extraction.
A Note on Batches
This setup handles one invoice at a time as they arrive, which fits how Zapier triggers naturally work (new file, new email, one event per Zap run). If you're processing invoices in bulk batches instead — a folder of fifty at once — it's usually simpler to run that batch through the Doxtract App directly rather than triggering fifty individual Zap runs, and reserve the Zapier workflow for invoices that arrive continuously, one at a time.
Getting Started
If you don't have a template yet, that's the actual first step — build one in the Template Editor, no signup required to try it. Check Pricing before wiring this into a live workflow; the free tier (200 pages/month) is enough to test the whole Zap on real invoices first.