How to Extract Data from Receipts: Merchant, Items, Tax, and Totals
Receipts pile up fast, in phone photos, email attachments, and PDFs, and typing each one into an expense report or accounting system is slow and easy to get wrong. With a template, you can turn them into structured JSON or CSV instead, with the merchant, date, purchased items, tax, and total ready to use. This guide shows how to extract data from receipts with DoxTract, from creating a template to processing a batch. For the general workflow, see our guide to extracting structured data from documents.
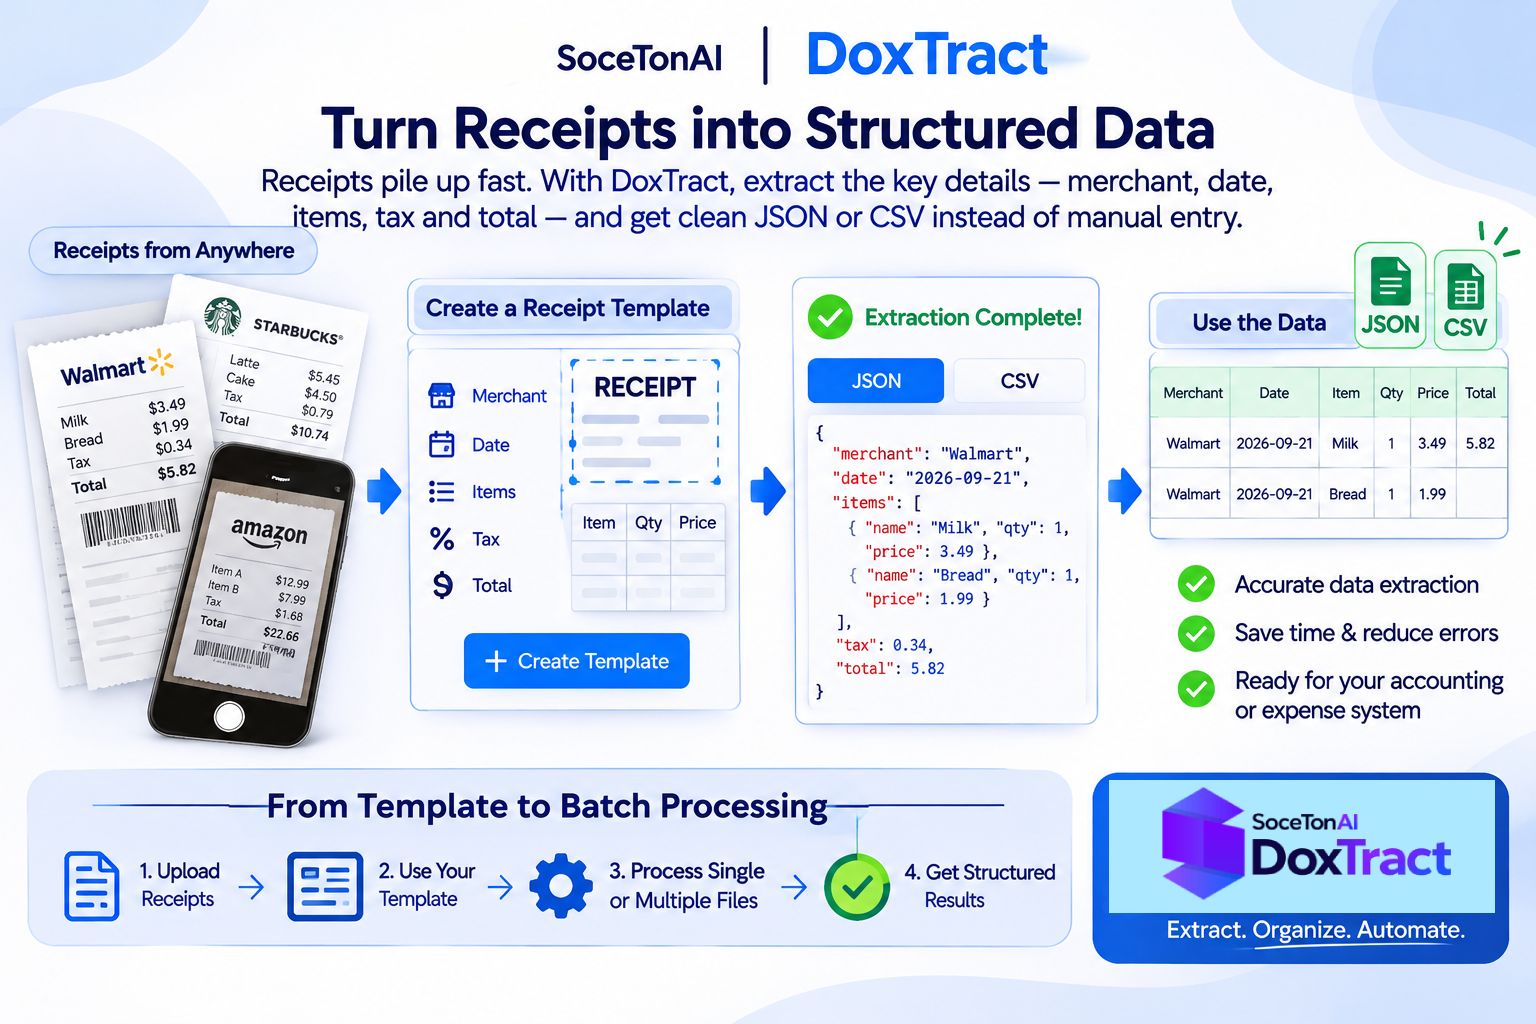
What Data Can You Extract from a Receipt?
A receipt holds two kinds of data: single values that appear once, and a list of purchased items that repeats. A DoxTract template can capture both.
Header fields
Merchant name
Address
Date and time
Receipt number
Currency
Subtotal
Tax
Tip
Total
Payment method (card type or last four digits)
Line items (table)
Item description
Quantity
Unit price
Amount
Header fields are extracted as single values. Line items come out as a list, one entry per purchased item, so a coffee receipt with two lines and a grocery receipt with forty both produce clean, structured output. You choose which fields to include, so you can start with just the merchant, date, and total for expense tracking, and add line items later if you need item-level detail.
Why Receipts Are Tricky
Receipts look small and simple, but they’re often harder to read than full-size documents:
Narrow, long layouts with tiny text. A receipt is a long, thin strip with small print, and a big shopping trip can run to dozens of lines.
Faded and damaged paper. Thermal receipts fade with heat and time, and crumpled or folded copies break up the text.
Phone photos. Most receipts are captured on the go, so angles, shadows, glare, and cropped edges are common.
Every merchant prints differently. Fonts, labels, and the placement of tax and totals vary from store to store.
Handwriting. Tips and signatures are often added by hand, and they sit right next to the printed total.
Because of this, receipts reward a little preparation: a template built around the merchants you see most often, and good capture habits, covered later in this guide.
Step 1: Create a Receipt Template
Start with a clear photo or scan of a receipt from a merchant you see often. Open the Template Editor, upload the receipt, and give the template a name and description, such as “Brightside Café receipt.” Then select the model you want to use for extraction.
Next, mark the fields. Draw a Fixed Header Box around text that stays the same on every receipt from this merchant, such as the store name, or labels like “Subtotal”, “Tax”, and “Total”. Then draw a Value Box around the data you want, name the field, and connect the two. Repeat for the fields you need: merchant, date and time, receipt number, subtotal, tax, tip, total, and payment method. Click Save to Cloud, and the template is ready to use from the DoxTract page.
[Screenshot: template editor with receipt header fields and their value boxes connected]
New to templates? Read template basics for the concepts, or the create template guide for the full walkthrough.
Setting Up Receipt Line Items
Receipts are long and narrow, and the number of items changes with every purchase, so the item table needs the same approach as an invoice table. For each column (description, quantity, unit price, amount), draw a Fixed Header Box around the column header and a Value Box around that column’s values, then connect them. Many receipts have no column headers, so use a stable label above the first item, such as “Item” or “Qty.”
To handle receipts of different lengths, enable Expand Height on each column and connect it to a Fixed Header Box below the items, such as the “Subtotal” label. When that label sits lower on a longer receipt, the value boxes stretch with it, so a two-item and a forty-item receipt both come out complete.
[Screenshot: receipt with column boxes, value boxes, and Expand Height connected to the Subtotal label]
The table extraction guide covers the full steps.
Step 2: Extract Data from a Single Receipt
With the template saved, go to the DoxTract page and click Modify Selection. Choose your receipt template and click Done, then select the receipt (an image or PDF) and click Extract Data. For a single file, the result appears right after processing.
Compare the output with the original. Check the merchant, date, and total, and make sure the item count matches. If something is missing or wrong, adjust the template and run it again. See the data extraction guide for the full walkthrough.
Example Output
Here’s what extraction looks like on a receipt. The sample is synthetic, so no real merchant or card data is shown.
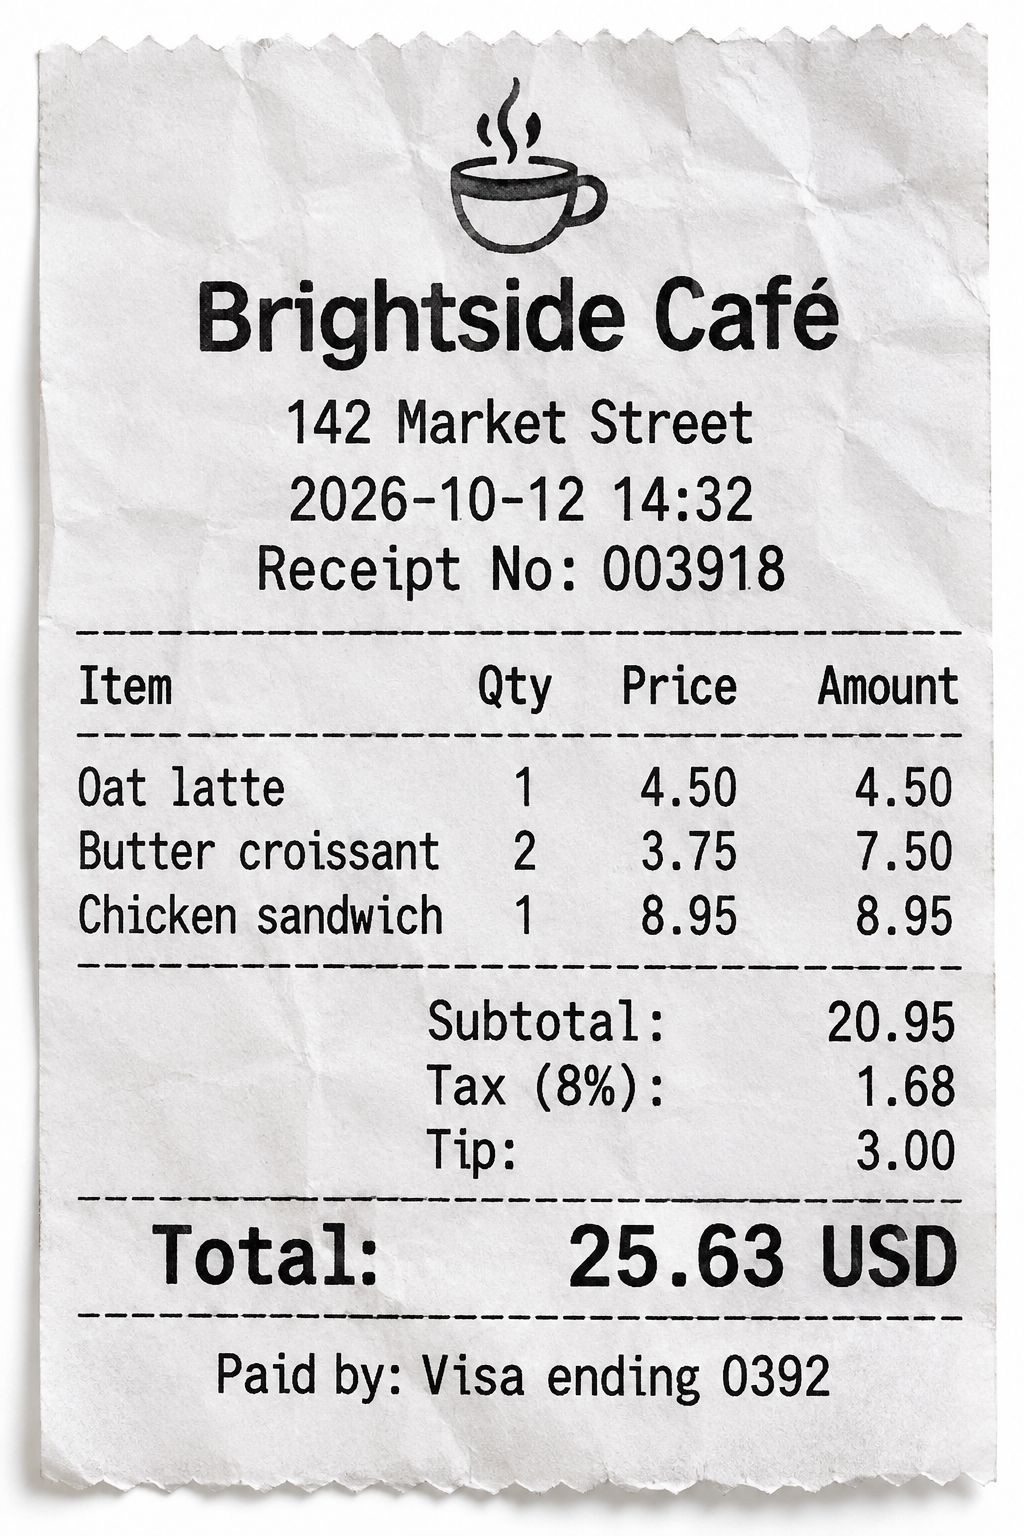
Extracted JSON
{
  "merchant_name": "Brightside Café",
  "address": "142 Market Street",
  "date_time": "2026-10-12 14:32",
  "receipt_number": "003918",
  "currency": "USD",
  "line_items": [
    {
      "description": "Oat latte",
      "quantity": "1",
      "unit_price": "4.50",
      "amount": "4.50"
    },
    {
      "description": "Butter croissant",
      "quantity": "2",
      "unit_price": "3.75",
      "amount": "7.50"
    },
    {
      "description": "Chicken sandwich",
      "quantity": "1",
      "unit_price": "8.95",
      "amount": "8.95"
    }
  ],
  "subtotal": "20.95",
  "tax": "1.68",
  "tip": "3.00",
  "total": "25.63",
  "payment_method": "Visa ending 0392"
}
Header fields come back as single values and the items as a line_items list, one entry per row. The data is easy to check: 20.95 + 1.68 tax + 3.00 tip = 25.63. In the dashboard, a batch job exports the same data as a CSV.
Step 3: Process Receipts in Batch
Once the template works on one receipt, you can process a whole stack. On the DoxTract page, choose your receipt template, select multiple images or PDFs, and click Extract Data. DoxTract creates an extraction job, and when it finishes you can download the results as a CSV file for Excel, Google Sheets, or your expense system. See the data extraction guide for details.
[Screenshot: batch job with multiple receipts and the completed job with the CSV download]
Automating it with the API
If receipts arrive continuously, such as from an expense app or a shared inbox, you can skip manual uploads. The DoxTract API lets your own app send receipts and get structured data back. Create an API key with the API keys guide, then call the endpoints from your app, an automation tool, or a scheduled job.
Handling Many Merchants and Layouts
Receipts differ more than invoices do. Every merchant prints its own layout, and a single expense report can include dozens of them. Since a template is anchored to the stable text on one layout (the store name, the “Subtotal” and “Total” labels), the practical approach is to build templates around the merchants you see most.
Recurring merchants: one template each. For stores, cafés, fuel stations, ride apps, or any vendor you receive receipts from regularly, create one template per merchant and name it clearly, such as “Brightside Café receipt.” A template is a one-time effort, and after that every receipt from that merchant extracts the same way. Chains are an easy win, because all their locations print the same layout, so one template covers every branch. Start with the five or so merchants that account for most of your receipts, then add more as the volume justifies it.
Standardized receipts. If you control the format, for example receipts generated by your own point-of-sale system, a booking platform, or a ride-hailing app, a single template can cover thousands of receipts.
One-off receipts. A merchant you’ll see once rarely justifies a template. Your options are to enter those few by hand, or, if the same merchant keeps coming back, to build a template the second or third time it appears. Sorting receipts by merchant before a batch run also helps, since each batch uses one template.
When a merchant changes its layout. Stores update their receipt design now and then, or switch point-of-sale systems. When a familiar merchant starts returning missing fields, edit the template instead of rebuilding it:
On the DoxTract page, click Modify Selection.
Click the edit icon next to the template.
Adjust the boxes in the Template Editor using one of the new receipts.
Click Save to Cloud.
If the new design is very different, save it as a new template so older receipts still work. See the update template guide for details.
Tips for Capturing Receipts That Extract Well
Most extraction problems start with the photo. These habits are worth sharing with anyone on your team who submits receipts:
Lay the receipt flat. Smooth out folds and creases, and place it on a plain, contrasting surface such as a desk or table.
Use good, even light. Daylight or a bright room works best. Avoid dark restaurants and car interiors where possible.
Avoid shadows and glare. Don’t let your hand or phone cast a shadow on the paper, and tilt away from glossy reflections.
Shoot straight on. Hold the phone directly above the receipt, parallel to it, so the text isn’t skewed.
Fill the frame, but capture the whole receipt. Include the top (merchant) and bottom (total, payment method) without cropping any edges. For very long receipts, a scanning app that stitches the full length works better than a single photo.
Capture faded receipts early. Thermal paper fades with heat and time, so photograph or scan receipts soon after purchase instead of weeks later.
Validating Receipt Data
Extraction gets the data out of the receipt, but a few quick checks catch most misreads before they reach your expense reports or books:
Totals add up. Line items should sum to the subtotal, and subtotal plus tax plus tip should equal the total. A mismatch usually means a missed or misread line.
The date is valid. It should parse as a real date, and it shouldn’t be in the future or far outside the reporting period.
Required fields are present. Merchant, date, and total should never be empty. A blank value means the template didn’t match or a field was missed.
No duplicates. The same receipt is easy to submit twice, so compare merchant, date, and total against what you’ve already processed.
Run these wherever the data lands. With the API or an automation tool such as Zapier, add a validation step right after extraction and send failures to a review queue instead of straight into your system. For CSV downloads, spreadsheet formulas can flag mismatches before you import.
Where to Send the Extracted Receipt Data
Once your receipt data is validated, send it where it’s needed. For no-code automation, the Zapier guide shows how to pass extracted data into the apps you already use. If you work in accounting software, the QuickBooks and Xero auto-import guide covers turning receipt data into ready-to-import entries. For expense reports and review, download the batch CSV and open it in Excel or Google Sheets. And for expense tracking apps or custom pipelines, use the DoxTract API to get structured JSON straight into your own systems.
Try It on Your Own Receipts
The fastest way to see how extraction works is to run it on your own files. Create a free DoxTract account and get 200 pages every month, enough to build a template for a merchant you see often and test it on a real batch of receipts.
Frequently Asked Questions
Can DoxTract extract line items from receipts?
Yes. Using table extraction, you map each column (description, quantity, unit price, amount) in your template. With Expand Height enabled, the table grows to fit the receipt, so a two-item and a forty-item receipt both come out complete.
Does it work with phone photos of receipts?
Yes. DoxTract extracts data from images and PDFs, so photos taken on a phone work. For the best results, photograph the receipt flat, in good light, straight on, with the whole receipt in the frame.
What about faded thermal receipts?
Faded print is harder to read for any extraction tool, and results depend on how much text is still visible. Capture thermal receipts soon after purchase, use good lighting, and test your template on your most faded examples before processing a large batch. Check any field that comes back empty or looks wrong.
Do I need a template for every merchant?
Generally, yes, for every different layout. A template is anchored to the stable text on a receipt, such as the store name and the “Subtotal” and “Total” labels, so merchants with different designs need their own templates. Receipts that share a layout, such as all branches of one chain, can use one template.
How do I turn receipts into an expense report or accounting entries?
Download the extracted data as a CSV from a batch job and open it in Excel or Google Sheets for an expense report. For accounting software, our QuickBooks and Xero auto-import guide walks through the setup, and you can also send the JSON through the API or an automation tool like Zapier.