Freelance Bookkeeper's Guide to Going Paperless
Most freelance bookkeepers are already mostly paperless without having a real system for it — a mix of forwarded email PDFs, phone photos, and the odd physical receipt a client hands over. That's not the same as being genuinely paperless. A real paperless workflow means every document, from intake to retention, has a defined digital path — and it means you can hand a compliant, organized digital record to a client or an auditor without a scramble.
Here's how to build that system, and why it's safer than it might feel.
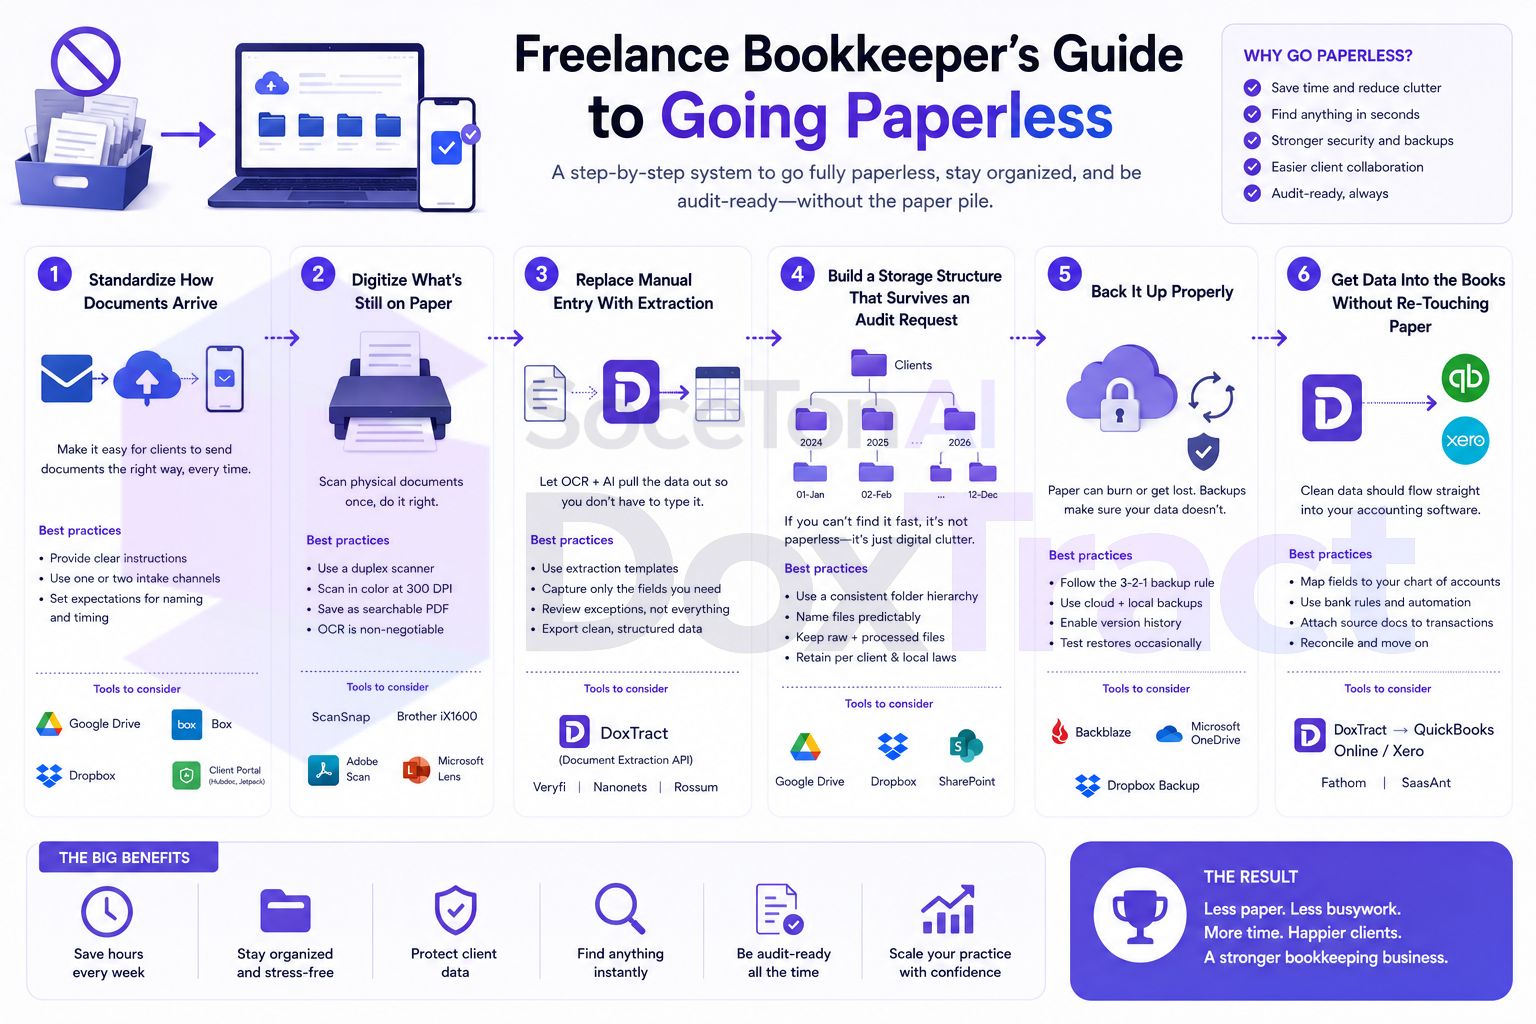
First: Yes, This Is Fully IRS-Compliant
The IRS has formally allowed paperless recordkeeping since 1997, under Revenue Procedure 97-22, later expanded by Revenue Procedure 98-25 to cover full accounting systems, not just individual scanned documents. A digital receipt satisfies IRS requirements as long as it's a legible, complete reproduction of the original, captures the required fields, is unaltered, and is retrievable on demand for the standard retention window. In practice, that means: no category of business receipt has to stay on paper for federal tax purposes.
Retention periods are the same whether records are digital or paper: generally three years after the associated filing, extended to seven years for underreported income, bad debt claims, or worthless securities deductions. Digital storage doesn't shorten what you need to keep — it just makes keeping it, and finding it later, dramatically easier.
One practical note: the IRS reminds taxpayers that digital records must be reproducible in a legible, readable format — so "somewhere on a phone in a photos app" doesn't count as a system. That's the gap this guide actually closes.
Step 1: Standardize How Documents Arrive
Going paperless starts before a document reaches you — it starts with how a client sends it. Pick one method per client and stick to it:
A dedicated forwarding email for receipts and invoices, separate from general client correspondence
A shared drive folder, scoped to that client only
A simple upload form or portal, if you want more control over naming and structure
The point isn't the specific tool — it's removing the "let me dig through my personal inbox" step that turns paperless into paper-with-extra-steps.
For a fuller rundown of the tools that support this, see our freelance bookkeeper tech stack guide.
Step 2: Digitize What's Still on Paper
For clients who still hand over physical receipts, scanning is a one-time conversion, not an ongoing habit to maintain. A phone scanning app or a flatbed scanner both work — what matters is legibility. Before discarding a paper original, confirm the digital copy is clear enough that every amount, date, and vendor name is readable; thermal receipts fade fast, so scan them close to the transaction date rather than letting a stack build up.
Step 3: Replace Manual Entry With Extraction
This is the step that makes "paperless" actually save time rather than just changing the file format of the same manual work. Reading each digital receipt and typing its data into a client's books by hand is still paper-era work — it's just paper-era work done from a screen.
Build a template per client (or per recurring vendor) in the Template Editor — no signup needed to try it — so every future receipt or invoice of that format gets its vendor, date, amount, and line items pulled automatically instead of retyped.
Two ways to run it, depending on your setup:
Dashboard (no code): upload a batch on the Doxtract page and click Extract Data — enough on its own for most solo bookkeepers and small practices.
API: for a practice with continuous document flow or its own systems, the same template can be called programmatically so new documents get processed automatically as they arrive. Details in the API docs.
Either path produces the same structured data — a CSV or JSON row per document — which is also exactly the kind of "indexed and reproducible" record the IRS's electronic-storage rules ask for, since it's tied back to the original document image rather than existing as a disconnected spreadsheet entry.
Step 4: Build a Storage Structure That Survives an Audit Request
The IRS recommends organizing digital receipts into folders by month and year, with regular backups to prevent data loss. A structure that works well for multi-client bookkeeping:
/Clients
  /ClientName
    /2026
      /01-January
      /02-February
      ...
Keep the original document (the scan or PDF) alongside the extracted data, not instead of it — the extracted CSV is for your workflow, but the source image is the actual legal record. Electronic records need to be protected against unauthorized access, alteration, or deletion for the full retention period, so treat that folder structure as append-only in practice: files get added and archived, not edited or deleted once filed.
Step 5: Back It Up Properly
A single cloud drive is storage, not a backup strategy. A reasonable minimum:
Primary storage in a mainstream cloud provider (Drive, Dropbox, OneDrive)
A secondary copy — either a second provider or a periodic export to local/external storage
Version history or a "recently deleted" recovery window enabled, in case a file is altered or removed by mistake
This matters more for a bookkeeper than for an individual, since you're the custodian of records for several clients' businesses at once — a lost folder isn't just inconvenient, it's a client's compliance record.
Step 6: Get Data Into the Books Without Re-Touching Paper
Once extraction produces structured data, the last step is getting it into each client's accounting platform — either as a direct CSV import matched to their chart of accounts, or via an API integration if you're running things continuously. At no point in a properly set-up paperless workflow should a bookkeeper be retyping a number they've already extracted once.
Common Pitfalls When Going Paperless
Treating "scanned" as "organized." A folder of 400 randomly named PDFs is technically paperless and practically useless. Naming conventions and status folders (see the multi-client organization guide) matter as much as digitization itself.
Skipping backups because "it's in the cloud." Cloud storage isn't automatically backed up against accidental deletion or a compromised account — build in redundancy.
Extracting data but keeping the retyping step anyway. If you're extracting a receipt's data and then manually re-entering it into the books instead of importing or automating that step, you've digitized the document but not actually removed the manual work.
Forgetting state-level rules. Federal IRS rules accept digital records, but a few states have additional retention requirements for certain paper originals — worth a quick check if a client operates somewhere with stricter state rules.
A Practical Rollout
You don't need to convert your whole practice in one week:
Pick one client and standardize their document intake first.
Digitize any remaining paper for that client.
Build one extraction template for their most common document type.
Set up their folder structure and backup routine.
Confirm the whole loop — intake to filed record — works end to end before moving to the next client.
Getting Started
Try the extraction step first, since it's usually the part that saves the most time once it's running: build a template in the Template Editor, no signup required. Check Pricing — the free tier covers 200 pages a month, enough to pilot the full workflow on one client before rolling it out further.